 C&C Chess Club
Mate with the queen — the cage
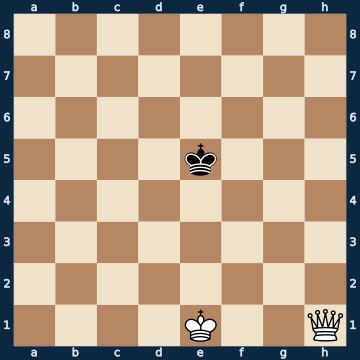
8/8/8/4k3/8/8/8/4K2Q w - - 0 1The plan
The first endgame a beginner ever opens, and one of the few you really should know without thinking. The method needs no calculation: the queen positions herself a knight's move from the enemy king — close enough to cut off the rank, the file and both diagonals, and far enough that it can never attack her. That marks out a rectangle, and every further queen move at the same distance shrinks it. No checks are needed for this. How fast it goes has been counted: before the first queen move the enemy king can still reach forty-two squares, afterwards only fourteen — one move takes away two-thirds of the board — and on the second queen move it is four. Only then does your own king come in, because the queen alone never delivers mate. And then the danger that gives this basic mate its reputation: stalemate. In THIS position it does not yet exist at all — of the twenty-one moves not a single one leads to stalemate, and the two that spoil the win merely put the undefended queen next to the enemy king. Stalemate only arrives with the edge: once the opponent has got there, every position in this teaching line has a stalemating move, and in the mating position itself there are three, plus three more that give away the queen. Six of twenty-eight moves throw the point away exactly where you already think you are done; there is a separate lesson here about these traps.
Rule of thumb: build the cage, shrink the cage, fetch the king — and as long as your own king is not there yet, always leave the opponent one square.
Why this level: Likewise basic knowledge; the only hurdle is stalemate
The solution, move by move
- 1. Qc6 The CAGE: a knight's move away. From there the king can never threaten the queen, and she cuts off the rank, the file and both diagonals at the same time. Before this it could reach forty-two squares, now only fourteen. Nineteen of the twenty-one moves win; the two exceptions put the queen next to the king.
- 1… Kf4 The king wanders around inside the cage. It cannot get out any more.
- 2. Kf2 The queen alone never delivers mate — your own king sets off. This is the part of the method beginners forget most often.
- 2… Kg5 Further inside the cage.
- 3. Qe6 A knight's move again, again without check: the cage shrinks from thirteen to four squares. Up to here stalemate is not yet possible at all — of the thirty-three moves none leads there.
- 3… Kh4 Now the king stands at the edge. From this moment — and not one move earlier — stalemate is possible in every position of this line.
- 4. Kf3 Your own king comes closer. And here, for the first time, there is a stalemating move: a single queen move would cost the whole point. It stands as a sideline right next to it — one tap is enough.Sideline 4. Qf5 STALEMATE, right in the middle of the way there. The move looks like the next step in shrinking the cage, and it is — only afterwards no square is left at all. This one move out of thirty-two does it; one move earlier stalemate would still have been impossible.
- 4… Kh5 The opponent has only two moves left. Both lead to mate.
- 5. Qf5+ Only NOW, with your own king in range, the first check. Here too there is exactly one queen move that stalemates, and two that give away the queen — one of them stands as a sideline right next to it.Sideline 5. Qg6+ The classic blunder: the UNDEFENDED queen placed right next to the enemy king. The check looks like progress. 5… Kxg6 She's gone, and the game with her. Only check with a defended queen or from a safe distance — and the king can never reach a knight's-move distance.
- 5… Kh4 The last move Black has.
- 6. Qg4# Mate: the queen gives check and is defended by her own king. How tight it gets here is shown by the count — of the twenty-eight moves in this position, three deliver STALEMATE and three give away the queen. Cage, bring the king in, mate.Sideline 6. Kf4 STALEMATE — one move before mate. Your own king takes away the last square the queen had still left the opponent. Three of the twenty-eight moves in this position do that, and all three are innocent-looking king moves. Which is why the rule is: count whether the opponent still has a move before you move.
Play it yourself
In the free app C&C Chess Club you step through the line move by move, tap the sidelines and play the position out against Stockfish — no account, no ads.
More in Basic mates
- Mate with the rook — fence and opposition White wins
- Mate with the two bishops — the shears White wins
- Mate with bishop and knight — the right corner White wins
- The staircase mate with two rooks — the roller White wins
- Stalemate traps when delivering mate — one square must remain White wins
- Two knights do not deliver mate — the corner is a stalemate nest Draw