 C&C Chess Club
The staircase mate with two rooks — the roller
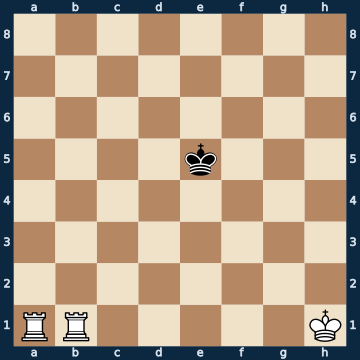
8/8/8/4k3/8/8/8/RR5K w - - 0 1The plan
Two rooks deliver mate without your own king ever having to take a single step — that is what makes this mating technique special. The method is called the staircase: one rook bars a rank, the other gives check on the next one, and so the enemy king is pushed rank by rank towards the edge. The two rooks never need to defend each other; they work on separate ranks and never get in each other's way. There is only one single catch: if the enemy king runs towards a rook, that rook simply slides to the other end of its rank — the rank stays barred, and the king has wasted a tempo. Measured, this is the most good-natured mating technique in the whole catalogue: in a sample of 4000 positions there was a move that could throw away the win in only five out of a hundred, and every single one of them was a stalemate. Even a rook given away for free costs nothing, because a rook alone also delivers mate — stalemate at the edge is the only real danger.
Rule of thumb: bar a rank, check on the next — and if the king gets too close, the rook sidesteps to the other edge; nobody ever needs to defend anybody here.
Why this level: Measured as the most good-natured mating technique: no move spoils it except stalemate
The solution, move by move
- 1. Rb5+ The first staircase step. The rook bars the rank the king stands on and thereby pushes it one rank further — up or down, the opponent decides that himself.
- 1… Kd4 The toughest defence: the king walks TOWARDS the rooks instead of running away from them. Whoever runs away is mated even faster (first sideline).Sideline 1… Ke6 The king runs away from the rooks instead of towards them. Understandable, and it speeds up the mate: the staircase now runs through completely undisturbed. 2. Ra6+ Rank by rank. White does not have to think about anything at all — just move the rook one rank higher, alternately. 2… Kf7 3. Rb7+ Kg8 The king has reached the last rank, and the last step waits there. 4. Ra8# Mate. Four moves, not a single king move by White, not a single moment to think. This is why this mating technique belongs in every club training session.
- 2. Ra4+ The second rook takes over the next rank. Note that the rooks do not defend each other, and do not need to — they stand far apart and are both safe anyway.
- 2… Kc3
- 3. Rg5 The key move of the piece, and a move WITHOUT check. The rook would next have to give check on the third rank; from its file it could only do that right next to the enemy king, and there it would be captured (second sideline). So instead it goes to the other end of the board beforehand — the fifth rank stays barred all the while.Sideline 3. Rb3+ The thoughtless staircase step: check on the third rank, but right next to the enemy king. 3… Kxb3 The rook is gone. This is exactly why, in the main line, it goes to the other edge first — that costs a tempo instead of a piece. 4. Rh4 And still nothing is lost: rook and king against the bare king is the next basic mate, won as ever. 4… Kc3 5. Kg2 Only now the white king has to come along too, and that takes time. Four moves have become a good fifteen — that is all this mistake costs. 5… Kd2
- 3… Kb3 Now the king attacks the other rook. Same recipe, same calm.
- 4. Rh4 The rook moves to the other edge and keeps the fourth rank closed from there. The black king has spent two moves chasing pieces and gained not a millimetre.
- 4… Kc3
- 5. Rg3+ Now the check lands, because the rook stands out of reach. The king has to go to the second rank.
- 5… Kb2
- 6. Rh2+ And one step lower still. From here it is over: the king stands on the second-to-last rank, and the next staircase step is mate.
- 6… Ka1 Into the corner — just as good or bad as the other two squares, all three are mate next move. But only here does the one trap of the whole mating technique still lurk (third sideline).
- 7. Rg1# Mate. One rook bars the second rank, the other gives check on the first — exactly the picture the staircase started with. The white king has stood in its corner for the whole game.Sideline 7. Rb3 STALEMATE — and so the only way to still spoil this mating technique. The rook takes away the king's last square in the corner without giving check. Of the 29 white moves in this position, exactly this one is wrong, and it costs the whole point. Which is why, at the edge, the rule always holds: check first whether the opponent still has a square.
Play it yourself
In the free app C&C Chess Club you step through the line move by move, tap the sidelines and play the position out against Stockfish — no account, no ads.
More in Basic mates
- Mate with bishop and knight — the right corner White wins
- Stalemate traps when delivering mate — one square must remain White wins
- Mate with the two bishops — the shears White wins
- Two knights do not deliver mate — the corner is a stalemate nest Draw
- Mate with the rook — fence and opposition White wins
- Rook and minor piece — the rook delivers mate, the piece is expendable White wins