 C&C Chess Club
Rook and minor piece — the rook delivers mate, the piece is expendable
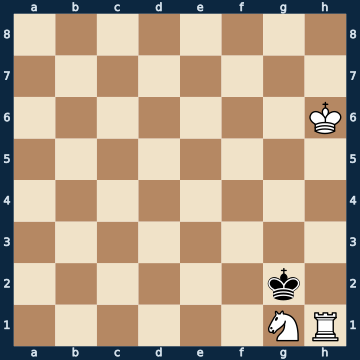
8/8/7K/8/8/8/6k1/6NR w - - 0 1The plan
Rook and minor piece against the bare king is not a method of its own but the rook mate with a helper: the rook drives the king to the edge, the minor piece takes away a flight square along the way. That saves time — in a sample of five thousand positions, the furthest measured distance to the goal for rook and minor piece was eleven to twelve moves, for the rook alone sixteen. But more important than the time is the division of roles, and it is starkly unequal: if the minor piece falls, the rook simply carries on winning alone; if the rook falls, the game is a draw at once, because a lone knight and a lone bishop do not deliver mate. That is why this mating technique, short as it is, is one of the most restless: in four out of ten positions there is at least one move on the board that throws away the whole point, whereas with the two-rook mate it is only one in twenty. Here rook and knight both stand within reach of the enemy king, and the solution is: save the rook, offer the knight. This is not a matter of taste, it is measured — at three points in this game the defender is allowed to take the knight without gaining a single half-move, and at the end he takes it and is mated two moves later.
Rule of thumb: the rook is the mate, the minor piece is only the doorman — give up the piece rather than a rook move into thin air.
Why this level: Rook plus expendable piece — comes onto the board after every material win
The solution, move by move
- 1. Rh4 The key move. Rook and knight are both attacked, and only three of twelve moves hold the win: the rook has to get out of the king's reach along its file. Everything else costs the rook and with it the whole point (first and second sidelines). The knight simply stays where it is — it is allowed to fall.Sideline 1. Kg5 The king sets off — the right idea, just not now. Five of the nine bad moves in this position are king moves, and all of them fail at the same point. 1… Kxh1 The rook is gone. Knight and king against the bare king is a flat draw — the tables know not a single winning position there. A whole point for one king step.Sideline 1. Nf3 The most understandable mistake of all: the knight is attacked, so it is saved. But it is the piece that does not matter. 1… Kxh1 And the rook falls. Whoever has two attacked pieces in the endgame must not save the threatened one, but the important one — here, the rook.Sideline 1. Rh2+ The finest trap of the piece. The rook goes next to the king with check and looks defended while doing so — the knight is standing right beside it, after all. 1… Kxh2 It isn't. A knight NEVER covers a neighbouring square; from its post it only reaches the ones one square further out. The square one rank below would have been covered, the one right next to it not — and that difference costs the whole point here.
- 1… Kf2 The toughest defence. It would be just as good to take the knight here: the tablebase gives both moves exactly the same distance to mate (fourth sideline). In this position the knight is literally worth nothing.Sideline 1… Kxg1 The knight is picked up at once. Measured, this changes precisely nothing: the tablebase gives this position the same distance to mate as the main line. 2. Rf4 Rook and king against the bare king — the very first basic mate, and it carries on unchanged. 2… Kg2 3. Kg5 Your own king comes in, the rook holds the opponent on its rank. This endgame needs nothing more. 3… Kg3 4. Rf5 The pincer closes rank by rank. Whoever took the knight got nothing for it — no tempo, no square, nothing at all.
- 2. Re4 The rook cuts off the king — and is only allowed to do so because the knight covers the square. Without the knight it would stand undefended next to the king.
- 2… Kg2
- 3. Rf4
- 3… Kh2 The king is pushed to the edge rank by rank, exactly as in the plain rook mate. Here too the knight would again be there for the taking, and again without any gain in time.
- 4. Rg4
- 4… Kh1 The ONLY move — the corner is reached. From here on it is only about bringing your own king in; the rook holds the position by itself.
- 5. Kg5 Now the white king marches. The rook already stands correctly and does not need to lift a finger any more.
- 5… Kh2 Again with no alternative. The king shuttles between two squares while the opponent calmly builds everything up.
- 6. Kf4
- 6… Kh1 And again the only move. The defender has nothing left to decide in this phase.
- 7. Kg3 The king steps next to the knight and deliberately hangs it. This is no oversight: White wants exactly this, because afterwards the black king stands in the mating net.
- 7… Kxg1 The ONLY move, and of all things a capture. The defender MUST take the piece, because otherwise it would have no legal move — and by capturing it walks for good into the corner it cannot escape from.
- 8. Rf4 The rook takes the second-to-last rank. This is the standard picture of the rook mate: your own king covers the flight squares, the rook gives check.
- 8… Kh1 The ONLY move — into the corner, where it is mate.
- 9. Rf1# Mate, with rook and king alone. The knight has been sitting beside the board for two moves and has not been missed. That is exactly the lesson of this lesson.
Play it yourself
In the free app C&C Chess Club you step through the line move by move, tap the sidelines and play the position out against Stockfish — no account, no ads.
More in Basic mates
- Two knights do not deliver mate — the corner is a stalemate nest Draw
- Queen against knight — the piece has to fall, but not at any price White wins
- Stalemate traps when delivering mate — one square must remain White wins
- The fifty-move rule — thirty-two moves needed, fifty moves budgeted White wins
- The staircase mate with two rooks — the roller White wins
- Mate with bishop and knight — the right corner White wins