 C&C Chess Club
The fifty-move rule — thirty-two moves needed, fifty moves budgeted
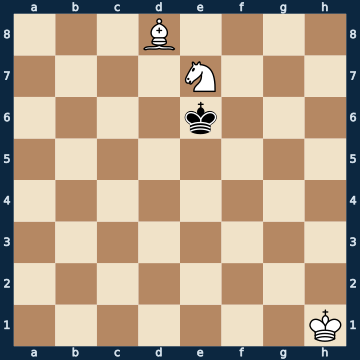
3B4/4N3/4k3/8/8/8/8/7K w - - 0 1The plan
Fifty moves without a capture and without a pawn move, then the game is a draw — even a won one. For almost every basic mate that is a non-issue: queen, rook, two rooks, rook and minor piece, even the bishop pair need between four and seventeen moves in the worst measured case, leaving thirty moves of slack and more. With the bishop-and-knight mate it is different. The hardest position with this material needs thirty-two moves, and that with FLAWLESS play — eighteen moves of reserve remain, and they disappear fast. This very hardest position is on the board here, and it is also the sharpest in the whole catalogue: of twelve moves two hold the win, the other ten give away a piece. The clock runs from the very first move, and your own king stands in the wrong corner — its march alone costs a fifth of the budget. So whoever looks for the method only at the board does not lose the point at the board, but on the count. Whoever knows it has enough time, but none to think.
Rule of thumb: with the bishop-and-knight mate, the winner is not whoever finds the way, but whoever already knows it — every move without a plan comes off the budget.
Why this level: Assumes the bishop-and-knight mate and then asks further: is there even enough time?
The solution, move by move
- 1. Ng8 One of only two moves that hold the win. The knight is attacked and has to move, but only two squares will do: from here it covers the square the bishop is about to sidestep to. On any other square it costs a piece on the next move (first and second sidelines) — and one piece fewer means a draw, because a lone bishop and a lone knight do not deliver mate.Sideline 1. Kg2 The king is supposed to come in, and it does need to — just not now. The knight stands within reach of the enemy king, and the bishop defending it is itself within reach. 1… Kd7 The ONLY move that settles the matter: the king attacks both pieces at once. 2. Bb6 The bishop saves itself and abandons the knight — there is nothing more in it. 2… Kxe7 One piece fewer, and the game is a draw. Ten of the twelve moves in the starting position end exactly this way.Sideline 1. Nc6 The knight goes to the centre instead of the edge — the more natural-looking move of the two, and still the loss of the point. 1… Kd7 Another double attack on bishop and knight, this time from the other side. On the edge square the knight would have stood outside this pincer. 2. Be7 The bishop sidesteps, and the knight can no longer be saved. 2… Kxc6 Draw. The difference between the right and the wrong knight move was a single square.
- 1… Kd7 The king now attacks the bishop and at the same time covers access to the knight. Best defence.
- 2. Be7 The bishop gets out of the king's way and takes up a square the knight defends. Without the first move this would not have been possible — the two pieces have to hold each other while your own king is still at the other end of the board.
- 2… Ke8
- 3. Bc5
- 3… Kd8
- 4. Ne7 The knight returns to its starting square. For four moves bishop and knight have done nothing but save each other; the black king stands as free as at the start, and eight half-moves of budget are gone. This is not poor treatment but the price of your own king standing so far away.
- 4… Kd7
- 5. Kh2 Now finally the king. From here to the battlefield are six steps, and nothing else happens in that time. Whoever sends it on a detour pays twice — with the move itself and with the budget (third sideline).Sideline 5. Ng8 A move the tablebase still counts as won — so it is NOT a mistake in the usual sense. Even so it belongs here: it costs three full moves, and three out of eighteen moves of reserve is a sixth. 5… Kc6 The black king uses the gifted time and keeps moving away from the dangerous corner. 6. Ba3 The bishop now has to be reorganised, because the knight is no longer standing where it should. 6… Kc7 7. Ne7 And the knight goes back to the square it should never have left. On the board everything stands as before, only the counter has moved on by six half-moves. Three such excursions, and the budget is used up. 7… Kd8
- 5… Ke8
- 6. Kh3
- 6… Kd8
- 7. Kg4
- 7… Ke8
- 8. Kf5 The king has crossed to the other half of the board. From here the real technique begins: king, bishop and knight form a chain and push the opponent towards the corner that matches the bishop's colour.
- 8… Kd7
- 9. Kf6
- 9… Kc7
- 10. Ke6 The tenth move, and after the reply a fifth of the budget is used up — the black king is not even at the edge yet. This is what this endgame feels like — and that is why it is the only basic mate where you have to watch both the clock and the move counter.
- 10… Kb8 The defender runs into the wrong corner, that is, the one of the wrong colour. That is exactly where it has to go, too, because in the right one it would be mated at once — and driving it from one corner to the other is the long part of the work.
Play it yourself
In the free app C&C Chess Club you step through the line move by move, tap the sidelines and play the position out against Stockfish — no account, no ads.
More in Basic mates
- Queen against knight — the piece has to fall, but not at any price White wins
- Rook and minor piece — the rook delivers mate, the piece is expendable White wins
- Two knights do not deliver mate — the corner is a stalemate nest Draw
- Stalemate traps when delivering mate — one square must remain White wins
- The staircase mate with two rooks — the roller White wins
- Mate with bishop and knight — the right corner White wins