 C&C Chess Club
Two knights do not deliver mate — the corner is a stalemate nest
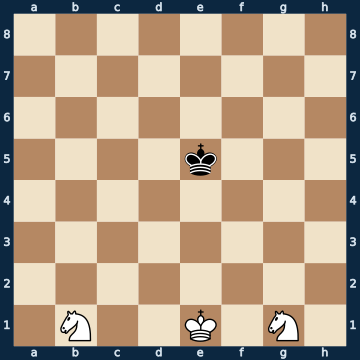
8/8/8/4k3/8/8/8/1N2K1N1 w - - 0 1The plan
Two knights and king against the bare king look like a sure win and are nonetheless a draw — the most famous exception in chess. You can indeed drive the king into the corner; in this line it even walks in voluntarily, onto the worst square on the whole board. Only the mating pattern cannot be built: the moment the second knight closes the last flight square, the opponent has no move left at all, and that is stalemate instead of mate. A knight simply needs two moves for the distance a queen or a rook covers in one, and it is exactly that one move that is missing every time. Whoever leaves a square free instead lets the king out of the corner, and everything starts over. The same holds for a single knight and for a single bishop: all three of these material balances are a flat draw, the tables know not a single exception. There is one special case, though, and it is as pretty as it is useless: if the defender still has a pawn that a knight blocks, the position is in fact won — only it often needs more than sixty moves, and the fifty-move rule collects the point first.
Rule of thumb: two knights can drive the king into the corner, but they do not deliver mate — whoever tries anyway stalemates the opponent.
Why this level: Pure book knowledge: it cannot be done. Easy to state, important to know
The solution, move by move
- 1. Kf2 White tries the best thing available here: the king goes ahead, because knights alone achieve nothing at all.
- 1… Kf6 Black deliberately plays along: it walks into the corner it should never go to. This is exactly the proof — even the most convenient path leads nowhere.
- 2. Kg3
- 2… Kg7
- 3. Nc3 The first knight sets off for the square from which it bars the corner. It needs three moves for that.
- 3… Kh8
- 4. Kh4
- 4… Kg8
- 5. Kh5
- 5… Kh8
- 6. Nd5 The knight is one jump from its goal. From here on everything is prepared — and from here on the problem begins.
- 6… Kg8
- 7. Kg6 The king takes the square that removes both neighbouring squares from the opponent. Now Black has exactly one square left in the corner, and the knight could close it: that would be immediate stalemate (first sideline).
- 7… Kh8 Black could also sidestep and be free at once. It goes into the corner anyway — and still cannot be caught there.
- 8. Nf3 The second knight sets off, because it takes both for the mate. It is three moves from the mating square, and it never gets those three moves.Sideline 8. Nf6 STALEMATE, and immediately. The knight takes the square that removes the king's last flight square — exactly the move you WANT to play, because it closes the mating net. Black is not in check and has no move: a draw. That is the whole story of the two knights in a single half-move.Sideline 8. Kf7 The other attempt: the king moves in even closer instead of fetching the knight. 8… Kh7 And a hole has already appeared. The king now covers the squares on one side twice over and the other side not at all. 9. Nf6+ Kh6 The king is out of the corner and walks away along the edge. White may start again from the beginning: that is the whole endgame, in a loop.
- 8… Kg8 The ONLY move Black has — and it has it only because White left the flight square open. Had White closed it, the game would already be a draw here.
- 9. Nf6+ The check drives the king once more, but it does not drive it into a corner: the net has a hole on the other side that two knights cannot plug.
- 9… Kf8 And it is out. The king strolls back to the centre of the board, the corner has done it no harm, and White starts over — right up to the fifty-move rule. Whoever goes back into the corner instead gets stalemated (second sideline). Either way it is a draw.Sideline 9… Kh8 Back into the corner instead of out — and now White faces exactly the same problem, only one step closer to the goal: one knight is already barring the way, the other still needs one more jump to the mating square. 10. Ng5 The jump that prepares the mate — and STALEMATE. The same one move is always missing, and you never get it, because the opponent has no move left at all while waiting. If White wanted to leave it one, he would have to open the net, and then the king is out again.
Play it yourself
In the free app C&C Chess Club you step through the line move by move, tap the sidelines and play the position out against Stockfish — no account, no ads.
More in Basic mates
- Stalemate traps when delivering mate — one square must remain White wins
- Rook and minor piece — the rook delivers mate, the piece is expendable White wins
- The staircase mate with two rooks — the roller White wins
- Queen against knight — the piece has to fall, but not at any price White wins
- Mate with bishop and knight — the right corner White wins
- The fifty-move rule — thirty-two moves needed, fifty moves budgeted White wins