 C&C Chess Club
Queen against knight — the piece has to fall, but not at any price
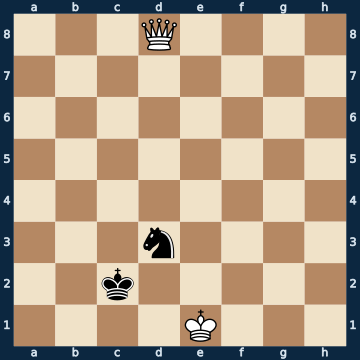
3Q4/8/8/8/8/3n4/2k5/4K3 w - - 0 1The plan
Queen against a minor piece is won, without exception — in a sample of three thousand positions every single one was a win, and in the worst case it took seventeen and a half moves for the piece to fall. The path there always runs the same way: the piece has to fall. You drive the enemy king to the edge with checks until king and piece stand far enough apart, and then pick up the piece with a double attack. The defender therefore does the opposite: he keeps his piece close to his own king, so that it stays defended. And that is exactly where the only real danger for the side with the queen comes from — she takes the defended piece, the king recaptures, and a certain win has turned into a draw. How big this danger is can be counted: in ninety-six out of a hundred won positions there is at least one move that throws the point away, and in five out of six cases it is the loss of the queen. Here this very trap stands on the board in the first move: the knight gives check and could be captured, and this very move is the only one that throws the point away. With the knight there is the added danger of the fork — it is the only piece that attacks a queen from a safe distance.
Rule of thumb: only take the minor piece if no king defends it — and keep the queen far enough from the knight that it cannot fork her.
Why this level: The knight fork against the queen costs points even at high levels
The solution, move by move
- 1. Ke2 The knight gives check, and the queen could capture it. Of the three legal moves this is exactly the wrong one, because the king defends the knight (first sideline). White instead calmly steps aside — the piece is not running away.Sideline 1. Qxd3+ Greed. The knight stands in check in front of the queen, it has just attacked her, and you get rid of it with one capture. 1… Kxd3 Except the king defends it. Two bare kings, a draw — out of a certain win in a single half-move. This is the most common mistake in this endgame, and the reason it is included here.
- 1… Nb2 The knight seeks the closeness of its own king. That is the right defensive idea: as long as the piece is defended, the queen cannot take it.
- 2. Qf6 The queen takes her distance and moves to the centre, from where she sweeps both wings. Two of the moves in this position are checks straight into the knight and cost the queen (third sideline).Sideline 2. Qd3+ The check meant to cut things short: the queen comes in and attacks king and knight at once. 2… Nxd3 And in doing so places herself right in the knight's jump. This too is a single half-move from win to draw, and this too is no accident but the nature of this endgame: the knight bites back if you get too close.
- 2… Kb3
- 3. Ke3 No check, no attack — just a king step. In the endgame queen against minor piece, your own king does the real work: it takes away the squares on which king and piece could stay together.
- 3… Na4
- 4. Kd4 Another king move. The white king comes closer step by step, and with every step the space in which the knight can stay with its king shrinks.
- 4… Nb2
- 5. Qf3+ Now the hunt begins. From here on the queen gives checks, and the black king is pushed into the corner — away from the knight.
- 5… Kc2
- 6. Qc3+
- 6… Kb1 The king is in the corner, the knight stands alone. This is the position the whole procedure has been working towards.
- 7. Qd2 The quietest and most important move of the piece: the queen positions herself so that she watches the knight and the square next to it, and forces Black to move. Seven of the twenty-four moves in this position throw the win away, including two harmless-looking king steps that fail to a knight fork (second sideline).Sideline 7. Kc5 The king moves in even closer — the move you would most likely play in this position, because it looks like nothing at all. 7… Na4+ The fork. The knight gives check and attacks the queen at the same time, and there is nothing to be done about it. The second king step in this position fails the same way, only to the other fork. 8. Kb4 The king has to get out of check, and the queen cannot come along. 8… Nxc3 Queen gone, game drawn. The knight is the only piece that can attack a queen without itself standing within her reach — which is why knight endgames against the queen are trickier than bishop endgames.
- 7… Na4 The knight has to jump, and wherever it jumps, it loses the protection of its king.
- 8. Qd1+ Check — and at the same time the attack on the knight. The double attack this whole endgame has been building towards.
- 8… Ka2 The king has to get out of check, and that loses the knight.
- 9. Qxa4+ The piece has fallen. What remains is queen and king against the bare king — the first basic mate in the collection, and from here on only the warning about stalemate still applies.
Play it yourself
In the free app C&C Chess Club you step through the line move by move, tap the sidelines and play the position out against Stockfish — no account, no ads.
More in Basic mates
- Rook and minor piece — the rook delivers mate, the piece is expendable White wins
- The fifty-move rule — thirty-two moves needed, fifty moves budgeted White wins
- Two knights do not deliver mate — the corner is a stalemate nest Draw
- Stalemate traps when delivering mate — one square must remain White wins
- The staircase mate with two rooks — the roller White wins
- Mate with bishop and knight — the right corner White wins