 C&C Chess Club
Stalemate traps when delivering mate — one square must remain
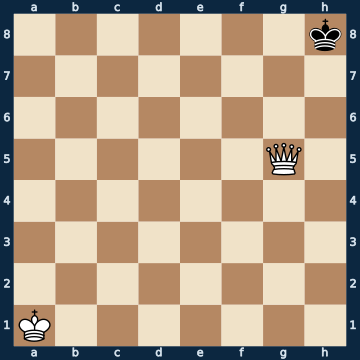
7k/8/8/6Q1/8/8/8/K7 w - - 0 1The plan
The queen is the strongest piece and, when delivering mate, the most dangerous one at the same time: she takes away so many squares from the enemy king that it often has no move left at all — and then the game is a draw instead of a win. Measured over a sample of 4000 positions: with the queen alone, more than three out of four positions have at least one move that throws away the whole point, and in about one position in thirteen a stalemate is exactly one move away. No other basic mate is anywhere near as delicate. Here the queen's work is already done: the enemy king sits in the corner and has exactly one square to shuttle on, entirely without any help from your own king. The safe method is therefore not to touch the queen again at all — every further queen move is only a risk, and the three worst of them take away the king's last square or give away the queen with an undefended check. Instead your own king marches all the way across the board, and only once it stands next to the mating square does the queen move, exactly once. The same trap exists with the rook, only rarer and therefore less well known: with the king in the corner and the rook next to it, one out of twenty rook moves is immediate stalemate.
Rule of thumb: always leave the trapped king one square, bring your own king in, and only give check with the queen once it is mate.
Why this level: The same technique, but with an awareness of stalemate
The solution, move by move
- 1. Kb2 The king sets off — right across the whole board. The queen stays where she is: she already blocks everything that needs blocking. Of the 26 white moves in this position, three throw away the win, and all three are queen moves.Sideline 1. Qd8+ The third wrong path, and the most common one: give check with the queen and hope something turns up. 1… Kh7 2. Qd7+ Another check, another king move. 2… Kh8 3. Qd8+ And the position is the same again. The queen alone never delivers mate, no matter how many checks she gives — she can only cover two of the three squares, the third has to be taken by your own king. That is why there is not a single in-between check in the main line. 3… Kh7
- 1… Kh7 The ONLY move Black has at all. The queen takes away both neighbouring squares on the file beside it, leaving only the shuttle between two squares on the edge.
- 2. Kc3
- 2… Kh8 Again with no alternative. This is exactly what makes the position so dangerous: whoever has only ONE square is a single careless move away from having none.
- 3. Kd4
- 3… Kh7 And again. The defender can do nothing wrong here — the attacker, on the other hand, can.
- 4. Ke5
- 4… Kh8 The only move for the fourth time. The white king has almost arrived by now; from here on it gets genuinely tricky for the side to move.
- 5. Kf6 The king's last step, and the most important moment of the piece. This is exactly where stalemate lies in wait: a single queen move to the square next to the enemy king takes away its last square — a draw (first sideline). And a queen check with no defence simply costs the queen (second sideline).Sideline 5. Qg6 STALEMATE. The move looks forced — the queen comes in and takes everything away from the king. That is exactly the mistake: she also takes away its last square, and because it is not in check, the game is a draw. A whole point, thrown away one move before mate.Sideline 5. Qg7+ The second trap: the check that already looks almost like mate. Only the queen stands right next to the enemy king and is defended by nobody — your own king is still one square too far away. 5… Kxg7 The queen is gone, bare kings, a draw. The very same move is mate one move later: the whole difference lies in whether your own king is already standing beside it.
- 5… Kh7 The only move for the last time — and this time it is no longer a shuttle but the walk to the scaffold.
- 6. Qg7# Mate. Now, and only now, may the queen step next to the king: her own king defends her. One queen move in the whole game, and it was the mate.
Play it yourself
In the free app C&C Chess Club you step through the line move by move, tap the sidelines and play the position out against Stockfish — no account, no ads.
More in Basic mates
- The staircase mate with two rooks — the roller White wins
- Two knights do not deliver mate — the corner is a stalemate nest Draw
- Mate with bishop and knight — the right corner White wins
- Rook and minor piece — the rook delivers mate, the piece is expendable White wins
- Mate with the two bishops — the shears White wins
- Queen against knight — the piece has to fall, but not at any price White wins