 C&C Chess Club
Mate with the two bishops — the shears
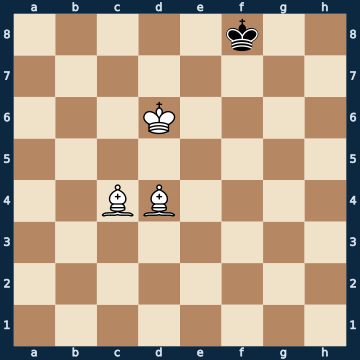
5k2/8/3K4/8/2BB4/8/8/8 w - - 0 1The plan
Two bishops side by side form a barrier the enemy king cannot cross: two neighbouring diagonals bar off an entire half of the board. The method is therefore not a sequence of moves but a shove: the barrier advances square by square, your own king marches right alongside and takes the flight squares the bishops cannot reach. It is driven into a CORNER — and unlike the bishop-and-knight mate, any of the four will do. Why the corner: mating patterns with two bishops exist only at the edge of the board, none at all in the centre, and on a corner square 196 different ones are possible against twelve on the square right next to it. It does not take long: from here the mate is there in nine moves. You can only lose the point in two ways. One is stalemate — already in the starting position there is a king move that stalemates at once, and in the mating position itself, of twenty-eight moves, sixteen are stalemate and only one is mate. The other is a hanging bishop: of thirty-one moves, four spoil the win, three of them putting a bishop within reach of the enemy king. Otherwise there is nothing to spoil — at no point in the line is more than one white move bad.
Rule of thumb: keep the bishops side by side, push the barrier square by square towards the corner — and before every move, check whether the opponent can even move at all afterwards.
Why this level: Rarely needed, but a basic mate belongs alongside the compulsory rook-endgame positions
The solution, move by move
- 1. Ke6 The king first — the bishops only deliver mate TOGETHER with it. Of thirty-one moves, twenty-seven win; the four exceptions are one stalemating move (first sideline) and three moves that put a bishop next to the enemy king (second sideline).Sideline 1. Kd7 STALEMATE — already on the first move. The two bishops cover f7, g7 and g8, the king takes e7 and e8: the black king has no square left. With two bishops, stalemate is the real danger, not the technique.Sideline 1. Bg7+ The second way to give away the point: a check that costs nothing — or so it looks. The bishop places itself within reach of the enemy king, and nobody defends it. 1… Kxg7 The bishop is gone, and a single bishop never delivers mate. This is exactly why the two bishops stay side by side and work from a distance: three of the four move-order-spoiling moves in the starting position are of this kind.
- 1… Ke8
- 2. Ba6
- 2… Kd8
- 3. Bb6+ The relay begins: the bishops give check in turn and push the king along the back rank towards the corner — a barrier that shifts forward step by step.
- 3… Ke8 The only move. This is what the barrier looks like from the inside: the two diagonals take away everything from the king but one square, and that one lies closer to the corner.
- 4. Bb5+
- 4… Kf8 Again with no alternative, and again one square closer to the edge. Every check from the two bishops works in the same direction.
- 5. Kf6 The white king marches right alongside and takes away the seventh-rank squares from the opponent. Without it the bishops could check forever without making progress.
- 5… Kg8 The only move, and this time no check came — the white king took the square. This is exactly how barrier and king take turns.
- 6. Kg6
- 6… Kf8
- 7. Bc5+
- 7… Kg8 The only move. The king now stands on the last square before the corner.
- 8. Bc4+ The second-to-last link: the light-squared bishop bars g8 — the king has only the corner left.
- 8… Kh8 The only move, and it leads exactly where White wants it. It can no longer sidestep.
- 9. Bd4# Mate on the long diagonal. Of twenty-eight moves this is the only one that mates — sixteen of the rest are stalemate (third sideline). The corner was free to choose, unlike in the bishop-and-knight mate.Sideline 9. Kh6 STALEMATE instead of mate. The king moves one square closer and takes away the opponent's last one. One move before the goal the position is so tight that of twenty-eight moves sixteen are stalemate and exactly one delivers mate.
Play it yourself
In the free app C&C Chess Club you step through the line move by move, tap the sidelines and play the position out against Stockfish — no account, no ads.
More in Basic mates
- Mate with the rook — fence and opposition White wins
- Mate with bishop and knight — the right corner White wins
- Mate with the queen — the cage White wins
- The staircase mate with two rooks — the roller White wins
- Stalemate traps when delivering mate — one square must remain White wins
- Two knights do not deliver mate — the corner is a stalemate nest Draw